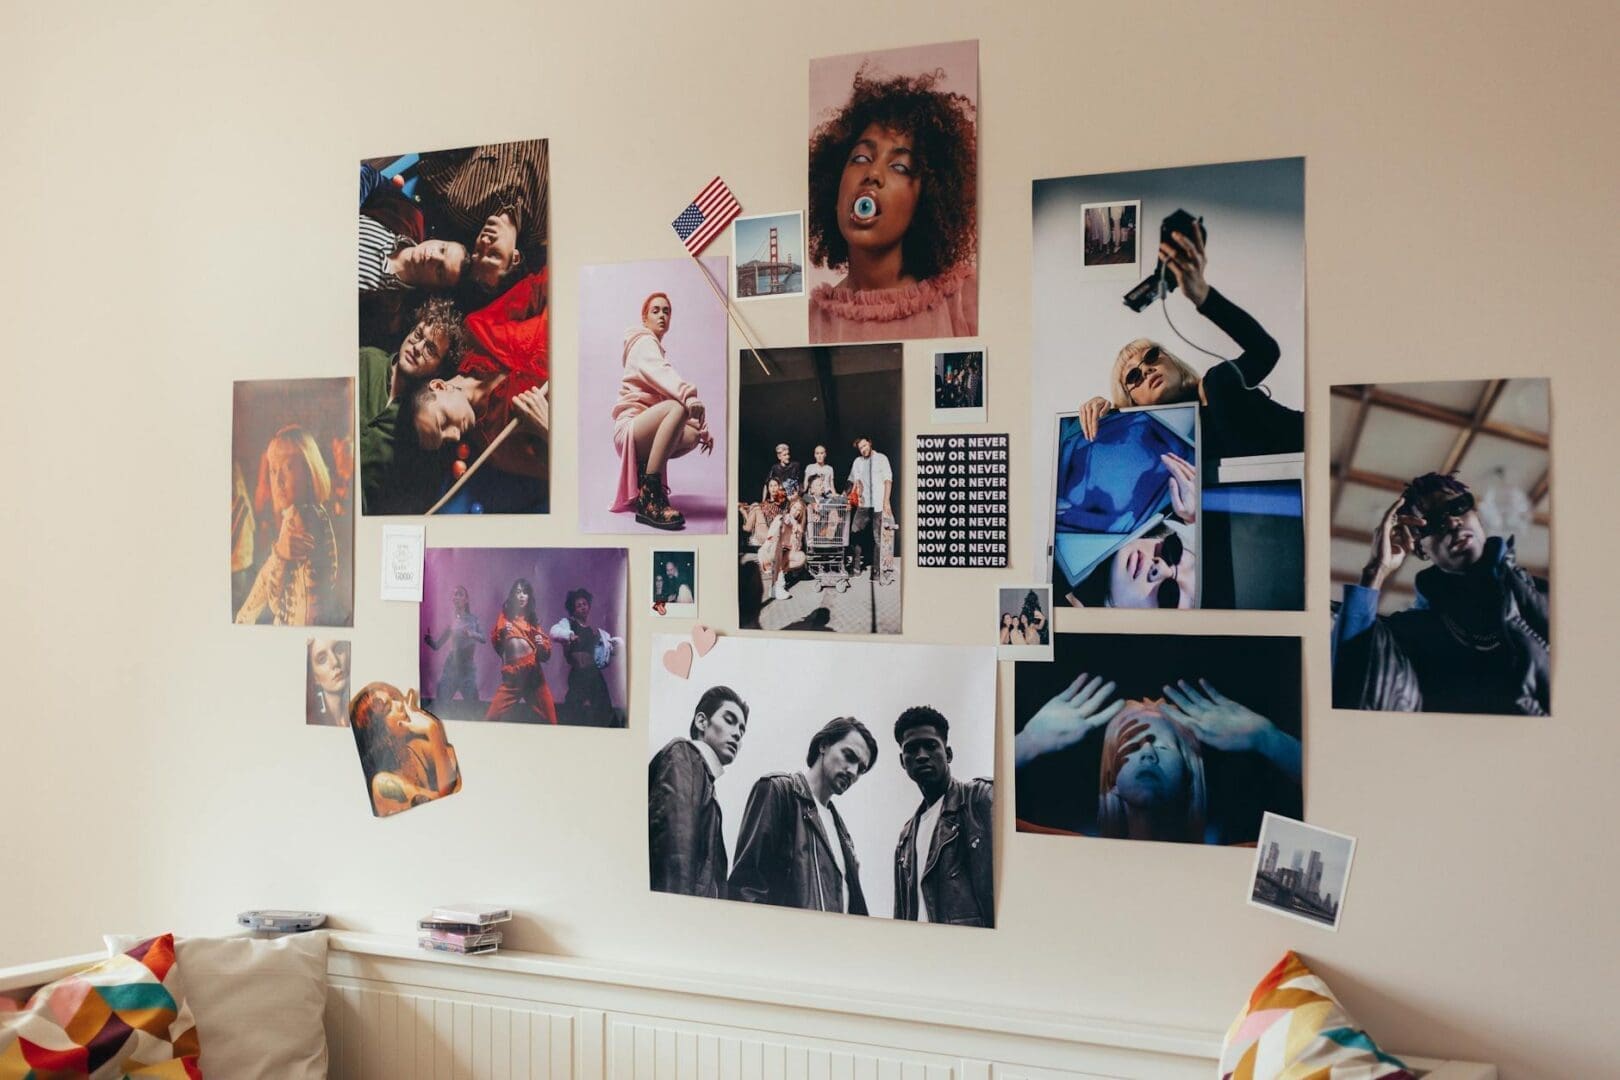
A blank wall in your living room is like an empty canvas—full of potential but somehow a little intimidating. You know you want to fill it with art and personality, but where do you start? Gallery walls have become one of the most popular ways to transform a space, and for good reason. They let you showcase what you love while adding visual interest and warmth to your room. The good news is that creating one isn’t as complicated as it looks.
Planning Your Layout Before You Hammer a Single Nail
The biggest mistake people make is grabbing a hammer and going straight to the wall. Trust me, you’ll save yourself hours of frustration by planning first. Start by measuring your wall space—a gallery wall typically works best when it spans about two-thirds the width of the furniture beneath it, like your sofa or console table.
Next, choose your layout style. A grid layout uses frames of the same size arranged in neat rows and columns, giving you a modern, organized look. This approach works especially well if you’re going for a minimalist vibe. Salon-style layouts mix different frame sizes and orientations for that collected-over-time aesthetic. If you’re somewhere in between, try an organic grid—it has some structure but allows for varied frame sizes.
Here’s a practical tip that’ll save your walls: lay everything out on the floor first. Arrange and rearrange until it feels right, then trace each frame onto kraft paper, tape the paper templates to your wall, and step back to see how it looks at eye level. This lets you adjust before making any holes.
Choosing Frames That Work Together
Your frames need some kind of unifying element, or the whole thing can look chaotic. The easiest approach is sticking with one frame color—black, white, natural wood, or gold are all solid choices that work across different decor styles. If you want more variety, you can mix frame colors as long as you repeat each color at least twice to create visual rhythm.
Budget-friendly frames start around $10-$20 for standard sizes at big-box retailers. Mid-range options ($30-$60) often have better quality materials and more interesting profiles. If you’re splurging on a few statement pieces ($80+), mix them with simpler frames to stretch your budget.
Standard frame sizes like 8×10, 11×14, and 16×20 are easier to work with because you can find affordable mat boards and prints to fit them. Custom framing is beautiful but can quickly balloon your costs to $100+ per frame. Consider saving custom work for one or two special pieces and filling in around them with standard sizes.
What to Put Inside Your Frames
This is where your personality shines through. Art prints are the obvious choice, but don’t stop there. Consider mixing in:
Family photos in black and white for a cohesive look
Botanical prints or vintage maps
Textile art or framed fabric swatches
Three-dimensional objects like small shelves or sculptural pieces
Mirrors to add depth and light
The key is variety in content but consistency in style. A gallery wall with modern abstract art, family beach photos, and vintage botanical prints might feel disjointed unless you’re intentionally going for an eclectic look.
The Hanging Process Made Simple
Start with your anchor piece—usually the largest frame or the one you want as the focal point. Hang this first, typically at eye level (57-60 inches from floor to center). Then work outward from there.
For hardware, picture-hanging strips work well for lightweight frames (under 8 pounds) and won’t damage walls. For anything heavier, use proper picture hangers rated for the weight. A small level is essential—even slightly crooked frames are noticeable on a gallery wall.
Spacing between frames should be consistent, usually 2-3 inches. Too close feels cramped; too far apart and they don’t read as a cohesive collection. Some people swear by using quarters as spacers—it’s a simple trick that works.
Creating a gallery wall takes some planning and patience, but the result is a custom focal point that makes your living room feel curated and complete. Start by selecting your frames and gathering your art, then spend an afternoon laying out your design. Once you’ve got a plan you love, the actual hanging goes faster than you’d think—and you’ll have a feature wall that reflects your style and tells your story.
There’s nothing quite like settling in for movie night at home, but harsh overhead lighting can ruin the whole experience. Too bright, and you’re squinting at a washed-out screen. Too dark, and you’re fumbling for the remote or straining your eyes. Getting your living room lighting right for movie watching isn’t complicated—it just takes the […]
You probably reach for your phone to change the temperature, lock your doors, or check who’s at the front door—so why are you still walking across the room to flip light switches? Smart lighting transforms your living room from a space with basic on-off switches into one that adapts to movie nights, dinner parties, reading […]
A chandelier can transform your living room from ordinary to unforgettable, but choosing the wrong size or style can throw off your entire space. Unlike task lighting that quietly does its job, a chandelier makes a statement—which means getting it right matters. Whether you’re working with vaulted ceilings or a cozy 10×12 room, here’s how […]